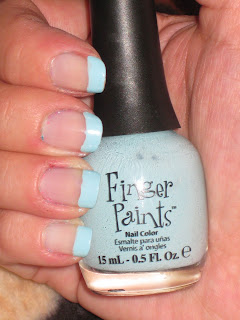
I decided to do a cute french with a pastel blue Finger Paint: Blissful Blue. Sorry the smile isn't perfect..it was free hand it about 45 minutes before work! Had to be quick.
Tuesday, May 4, 2010
China Glaze & Finger Paint
I decided to do a cute french with a pastel blue Finger Paint: Blissful Blue. Sorry the smile isn't perfect..it was free hand it about 45 minutes before work! Had to be quick.
Sunday, April 25, 2010
Nail foil and finger paint
This is Dream a little dream by Finger Paints. It's such a gorgeous pearl blue. I really like the coverage too, I only needed two coats. It's a very nice color for summer!
I tried the Nail Foil on Gel nails, just at the tips...and not so successful, they look nice in the picture but after touching a few things they started chipping and peeling =( So I don't think it's made to go on Gel. But i'll try some more!
Friday, April 23, 2010
Rainbow Swirl
Dollar Nail Art Haul
Wednesday, April 21, 2010
Sunday, April 18, 2010
April showers brings may flowers!
I am intrigued by this, I also absolutely adore China Glaze: Up&Away Collection, they have such beautiful spring colors! For this look I had used two coats of China Glaze: Something sweet and then for the design Konads: M73 and Konads: Special Black Polish. The edges are still a tad black because the special polish is VERY opaque so it's very hard to come off the skin (if you get any on), but a couple of hand washes and you're golden!
Some spring looks for nails
So I don't have very clear pictures of these nail designs but you can get an idea of how it would look like if you tried these looks at home. I was absent from my camera, but now I have it back so i'll be taking clear pictures! So my blackberry was the next best thing. Hope you all don't mind!

I went on a trip to Florida and I didn't want to do palm trees and such, so I decided to go for a more tropical color look..the beachy vibrant flavor. The picture does it NO justice it was SO beautiful. What I used for this look was a base coat I used OPI natural base coat but you can really use any one you'd like. Then I used Konads: M19 for the french tip. Then I used "Stripe" nail design polish, it has a very thin brush so you can make thin lines or thick which ever you prefer. They don't have the names on the bottle but you can get an idea. You can get them at the "Sally's Beauty Supply"

This look is bright also. I LOVE NEON. I did this look just to start feeling the summer vibe, it's very close and cannot wait till the heat comes! So I used China Glaze: White on White. For the flowers I had use Konads: M57 and to get the tips for an airbrushed look I used a sponge foundation applicator, I just apply a bit on the sponge and start dabbing the area I want it to go on...this gives it an air-brushed look. Very unique. The nail Polish colors are from Charlotte Russe so they don't carry it anymore, but you can use any colors!

So I don't have a very clear picture of this one but it looked so nice! It was very classy, yet sexy. What I used was China Glaze: Liquid Leather and for the design I used Konad: M71 - I didn't use the special polish so I used Finger Paint: Blissfully Blue..it gave it a nice tone to the design.

This look was one of my favorite's as well. I started expierementing with water marbeling..and I am a tad hooked. This look is a bit on the plain side but I added the hot pink to put a little umph in it! You can choose which ever colors you would like..and to know how to do water marbeling, you can go on youtube and search tutorials!
Friday, January 1, 2010
Nails : Starry Night!

This is a neat look I came up with, it's very simple to do...
What I used:
For a base coat I had used Natural Nail Base Coat by O.P.I
Second step was the nail color, I had used Russian Navy by O.P.I..I had done two coats and waited for that to dry
For the corners I had used Positive Energy by Nicole by O.P.I, it's a chrome color so you only need one coat, I had used the brush and just swiped it from one edge to the other..after I finished that I took a dotting tool (you can also use a toothpick) that you can find at Sally's beauty supply or any art store really and made a few dots following the edge.
For the stars I had gotten this little nail art designs you can find at Sally's Beauty Supply as well..it was 4.99 I believe for a little container..I had used a clear nail polish and placed it where I wanted the stars to be on my nails and so they would not fall off so easily..
Once everything was dry, I had went ahead and applied a top coat, and I used O.P.I top coat..
I found this look fun, and I hope you enjoy it too...let me know if you try this out and how it turned out!
Subscribe to:
Posts (Atom)